
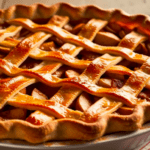
There’s nothing more comforting than a homemade apple pie straight from the oven, and Nana’s Apple Pie Recipe is as classic as it gets. Made with tart Granny Smith apples, sugar, and a flaky lattice crust, this traditional apple pie is simple, nostalgic, and perfect for holidays or Sunday dessert.
With just a handful of ingredients and a store-bought crust for ease, this homemade apple pie recipe delivers warm, sweet flavor in every slice.
Why You’ll Love Nana’s Apple Pie Recipe
- Classic old-fashioned apple pie
- Simple, pantry-friendly ingredients
- Perfect balance of sweet and tart
- Beautiful lattice crust
- Great for holidays and gatherings
- Beginner-friendly
Ingredients for Nana’s Apple Pie
The Pie Crust
1 box Pillsbury pie crusts
Using refrigerated pie crust keeps this recipe simple while still delivering a flaky, golden crust.
The Apple Filling
4 Granny Smith apples, peeled, cored, and thinly sliced
1 cup sugar
2 tablespoons flour
2 tablespoons water
Granny Smith apples are perfect for apple pie because they hold their shape and provide a tart contrast to the sugar. Flour thickens the filling while baking.
Equipment We Love for This Recipe
Shop All Our Kitchen Favorites on Amazon
Nana’s Apple Pie Recipe: Classic Granny Smith Apple Pie with Lattice Crust
Ingredients
- 1 box pillsbury pie crusts
- 4 granny smith apples
- 1 C sugar
- 2 TBSP flour
- 2 TBSP water
Instructions
- Put one pie crust into a deep dish pie pan
- Peel, core and thinly slice apples and put in a mixing bowl
- Add sugar, flour and water and mix well
- Pour onto the crust
- Take second pie crust and cut strips and put in a lattice on top of pie mixture
- Bake at 400* for 45 to 55 minutes
Notes
How to Make Nana’s Apple Pie
Start by placing one pie crust into a deep dish pie pan. Prepare the apples by peeling, coring, and slicing them thinly.
Mix apples with sugar, flour, and water until evenly coated. Pour the filling into the crust.
Cut the second crust into strips and arrange in a lattice pattern across the top. Bake until the crust is golden brown and the filling is bubbling.
For best results, cover the crust edges with foil during the first part of baking to prevent over-browning.
What to Serve with Nana’s Apple Pie
This classic apple pie pairs beautifully with:
- Vanilla ice cream
- Whipped cream
- Caramel drizzle
- Hot coffee (try our Praline Coffee)
- Spiced cider
It’s especially perfect for Thanksgiving and fall gatherings.
Storage & Reheating
Storage:
Store covered at room temperature for up to 2 days or refrigerate for up to 4 days.
Freezing:
Freeze baked pie for up to 2 months.
Reheating:
Warm slices in oven at 350 degrees for 10–15 minutes.
Frequently Asked Questions
Can I use a different apple variety?
Yes, Honeycrisp or Fuji can work, but Granny Smith provides the best tart balance.
Do I need to pre-cook the apples?
No, they soften perfectly while baking.
Can I make this ahead of time?
Yes, bake the day before and store covered.
Why use flour in the filling?
Flour thickens the juices so the pie sets properly.
Final Thoughts
Nana’s Apple Pie Recipe is a timeless dessert filled with warm, sweet apple flavor and a beautiful golden lattice crust. It’s simple, nostalgic, and always a crowd favorite.
If you make this recipe, tag us so we can see. We love seeing how you style your food and bring a little Southern hospitality into your home.
Enjoy!
McKaylee & Michele
MckMich Collective


Comments +